27 February 2012

Slow Cooker Moroccan Chicken

Growing up, my mom used her slow cooker for beans and maybe a stew every now and then. I didn't think much about using one myself and a few over-cooked chickens later, I figured maybe the only thing they were good for was beans.

I now realize that the slow cooker isn't a terrible way to cook. It's just there are a lot of terrible slow cooker recipes. Those where you simply dump things in, walk away and come back eight hours later expecting a decent dinner.

The secret to the slow cooker isn't that it is effortless. You merely put out the effort hours before dinner, so that the reward is truly at mealtime, when you've just got to serve.

Here's a chicken dish our family has been enjoying. I usually serve it over rice or couscous. Using chicken thighs is just tastier, plus they hold up better to the long cooking time without getting too dry.

Combine 1/4 teaspoon of cinnamon, coriander, paprika and cumin in a bowl. Add 1/2 teaspoon salt and a little bit of black pepper.


Toss 3 to 4 medium chicken thighs in the spice mixture to coat. Set aside.

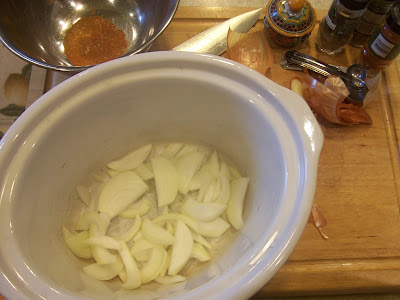
Slice one medium onion.

Slice a couple of good sized carrots.

Round up some dried fruit like these prunes, raisins or apricots.

Begin to layer the ingredients in the slow cooker. Start with onions and carrots.

Then the chicken.

Then the dried fruit. Drizzle a bit of olive oil over it all.

Cook on low for about 3.5 to 4 hours. The precise cook time will vary on the cooker and the size of the chicken thighs. Don't overcook. If the chicken is ready before you are, turn the heat off and keep the lid on to keep warm. If you need to hold it even longer, remove from cooker, cool, refrigerate and reheat before serving.

Dinner.

15 November 2011

Boxed food, the good kind

Recently when my friend Heather was dropping off my weekly goodies from her grocery delivery business, she said she had a deal for me. She'd leave me a small cardboard box full of winter veg if I'd cook it up, write it down and pass it along. Sounded like a fair trade to me.

Here's what was in my box:

1 butternut squash
4 medium carrots
2 bunches bok choy
1 bunch of kale
1 lemon cucumber
2 kohlrabi
1 yellow summer squash
4 habaneros
several turnips
handful of potatoes
couple of jalapenos
few other random peppers
dozen or so small, hot green chilies

And here's what I did with it:
  • Summer squash and kale saute. Nice, quick side dish or part of a veg entree on top of rice, pasta or a baked potato. Slice veg. Heat a tablespoon or two of oil in a heavy-bottomed skillet. Add squash and season with salt and pepper. Give the squash time to brown and get yummy before pushing it around the pan. Once the squash is done, add the kale and a touch more oil and cook, moving veggies around the pan for a minute or two. Season with more salt. Turn the heat off and remove from pan.
  • Pepper preserves. The habaneros and tiny green chilies are too hot for my crowd, so I dried them in my dehydrator. Simple enough. Just cut off the stems and threw them in. I store the in an air-tight container (read: old peanut butter jar) with other dried chilies. I use them when cooking beans, in soups, dips, casseroles, etc. The handful of jalapenos were married with the remaining ones from my own garden for a batch of jalapeno jelly. Yum.
  • Pear and Butternut Squash Soup. Cut off both ends of the squash. Then cut in half, lengthwise. Scoop out seeds (I use a grapefruit spoon) and discard. Rub a little oil, salt and pepper on the exposed flesh of the squash and roast in a 400 degree oven, flesh side down, until the squash is fork tender. Remove from oven and let cool completely (if you can do this the night before, you'll make quick work of your soup the next day). Once completely cool, you can easily peel away the skin and discard. Saute one small onion in a stock pot. Add a few cups of stock (veg or chicken). Add squash and a can of pears and the juice. Use an immersion blender (or work in batches with a food processor or blender) to puree. Heat pureed soup and finish with cream, milk or a few tablespoon of butter. Serve hot topped with creme fraiche or sour cream and crusty bread.
  • Dress up a salad. Kohlrabi looks funny with it's tough outer skin, and stems shooting out all around. It's actually a very nice, mild flavor that can add a bit of a crunch (think jicama). To prep, pull off the leaves (which could be swapped for kale in many recipes). Use a paring knife to peel off the fibrous skin. Then slice, cut matchstick pieces, cube or grate. Toss in a salad along with that lemon cucumber. Or munch on it with carrot sticks and apples for a healthy snack.
  • Bok Choy, cherry tomatoes and fried egg over rice. Trim the end off the bok choy and slice crosswise into inch-wide strips. Add a bit of oil to a hot skillet and add the bok choy. Season with salt and pepper and cook until nearly done. Add tomatoes and cook just until burst. Remove from skillet and dump directly onto cooked rice. In the same pan, fry an egg. Slide cooked egg off the skillet and on top the veg. Season with salt and pepper.
  • Curried Root Veggies. Prep and slice carrots, potatoes and turnips into similar-size pieces. Toss with oil, salt, pepper and curry powder. Spread in a single layer onto a rimmed baking sheet. Roast in a 400 degree oven until fork tender and veggies brown nicely. Another veggie that will merry well in this mix is cauliflower. This is a great side dish or serve atop coconut rice for an entree.
(These veggies were fine, but they would have been better with a bit more time in the oven to get nice and browned. I had screaming kids, so I pulled mine a bit early. Do whatever keeps you sane!)

31 October 2011

Caterpillar Cake!


I am a big planner about some things. And others, well, I do better if I just start working and create as I go. This frustrates the heck out of the Hubs at times, but, alas, I'll call it one of my more endearing qualities.

I've been saying for about two weeks that I was going to make Carter a caterpillar cake for his birthday. I didn't exactly have the execution planned out, just the idea. His birthday was Sunday, so by Saturday I thought I better get to it. I had nearly all of the ingredients on hand except powdered sugar, and I still needed to get dinner supplies, too. So we loaded up and headed to Safeway, boys in tow, to buy four pounds of confectioner's sugar, a package of hot dogs, buns and two bottles of wine. The teenage checker, I'm sure probably gave me a low score on the Mom-of-the-Year scale, especially considering the roaming 3-year-old boy who laid down in the middle of the wine aisle because he thought it would be funny to block the cart. Good thing I shop on price instead of tasting notes. We'd have been there a long time!

After a walk home in the rain from church on Sunday morning, I got to baking. The text book would tell me to bake the cake well in advance of decorating time, but this momma was working on Halloween costumes the night before, so something had to give. Here's a quick run down of how I made the cake. It wasn't too difficult, and had I not been trying to wrangling two kids, it wouldn't have taken too long to decorate.

  1. I am so unoriginal, I once again used this cake and icing recipe. I baked three cupcakes and one cake in a Bundt pan. After making the icing, I pulled about one cup out and mixed green food coloring into the red. Then I tinted the remaining one cup red. I was going for the Very Hungry Caterpillar look.
  2. After letting the cakes cool for about an hour, I leveled the bottom off the Bundt cake, reserving the cut off portion for later use. Then, I cut that cake in half to form two semi-circles. I set one of the halves aside. I took the other half and cut that in half once again. The semi-circle forms the back, then place the other two pieces in the opposite direction to for the neck and tail, both curling upward. The whole cake should be assembled on something flat and much large than the cake. I didn't have a platter large enough, so I turned a cookie sheet upside down and covered it with foil. You could also buy one of those fancy cake boards at a craft store.
  3. Take the cupcakes and break them up. Toss them in a bowl with something sticky. You could use frosting (cake pop style), but I used about two tablespoons of homemade strawberry jam. The consistency was perfect, runny and so, so sticky. Then I used a pastry blender -- a fork would work, too -- and mashed the whole thing up well. Try taking a small pinch and forming a ball. If you can do that, you're ready to move on to the next step. If it's still too crumbly, add more frosting or jam, mash some more until you can form the ball.
  4. Make a large ball out of the cake and jam/frosting mixture. Place that ball on the neck end of the caterpillar and ta-da -- you've got a head!
  5. Next, use the remaining cake that was reserved when you leveled the Bundt to fill in any cracks in your creation.
  6. Then, using small sheets of wax paper, line the underside of the cake. Place the sheets just barely below the cake surface, so that they will pull away easily. These will be removed after frosting, so that you will have a clean surface under the cake.
  7. Frost the body green and then the head red. An offset spatula is the best tool for this, which you can pick up at any store that sells cake decorating supplies. After frosting I gave the body a good dose of colored sprinkles. Remove the wax paper and place the cake in the refrigerator. The icing will set up a bit when cooled.
  8. I used Tootsie rolls to make the eyes, antenna, feet and grass. I (thankfully) had chocolate, lime and vanilla Tootsie rolls handy from the Halloween candy bowl. You can pinch or cut the Tootsie roll and shape them pretty easily with your hands. For the eyes, I just rolled them into a ball and smooshed them with a rolling pin. Super simple. I made all of the shapes and then set them aside.
  9. Take whatever cake bits you have leftover and toss them in the food processor with a few graham crackers. Buzz. This is the dirt you can sprinkle around the caterpillar. If you don't have a food processor, you could just crush up graham crackers by placing them in a zip top bag and taking a rolling pin to them.
  10. Lastly, pop the Tootsie roll decorations onto the cake.
  11. Enjoy!

30 September 2011

Birthday cakeS


Word to the wise mama: When you're picking up those birthday supplies, grab a bottle of Cab or some other soul-warming drinky winky. Because after the kind of 3-year-old celebrating we've been doing around here, you'll need it.

My big boy is 3, and while I believe he grew out of the Terrible Twos, he's making great progress in the Thwarting Threes. As in, anything I attempt to do, he somehow manages to intervene, steal the show, redirect my attention or otherwise drive me insane. Like yesterday when my sister-in-law called at the exact same time I notice a huge bug crawling up my arm. Either of these things alone could redirect one's attention. But at that very moment Jasper notified my that, despite being a mere inches away from the toilet, he'd peed his pants. Then he kicked off his Crocs (my direction, of course) that were mere portable puddles of piss. See what I mean? I can't freak out about a bug. I can't have a conversation with another adult. I'm dodging flying pee, throwing a kid in the tub and mopping the floor with what was once a nice hand towel.

Despite all of this, I can't get enough of this crazy boy. His grand day was filled with excitement that started with chocolate chip pancakes and ended with one huge slice of cake. And after the boys were snoring happily in a sugar-coated dreamland and I had scrubbed frosting from the floor, walls and clothes, the Hubs and I enjoyed a beer. And a little peace and quiet.

I made cake and cupcakes on two separate celebrations. I know, the kid's only 3, and I'm already certifiable. The first was cupcakes baked into ice cream cones. The second was a more traditional cake. They both used the same cake recipe, which you can find here. And the frosting is vanilla cream cheese.


It was easier than I'd guessed to bake the cake right in the cones. Just placed them on a baking sheet, filled with batter about 3/4 of the way full and baked. After one batch of underdone cakes, I discovered it was better not to pack them too tightly together as I did first in a casserole dish, thinking they'd tip over too easily. The second round I used a cookie sheet and just walked them very carefully to the oven. After cooling completely, I frosted them. Then we set up several small bowls of candies and let kids decorate their own. Fun, yummy and so much less messy than regular cake or cupcakes!


To make the J, I placed a piece of wax paper on top of the cake before frosting. With a Sharpie marker, I wrote the letter J on the wax paper in the size that was appropriate for the cake. Then, I placed the wax paper on a cutting board and used a paring knife to cut out a stencil, using the original J I'd made as a guideline for size. You could also trace an actual stencil on the wax paper. Then, after frosting the cake, I placed the wax paper stencil directly on the frosting and filled in with the sprinkles. After carefully removing the wax paper stencil, I then used a small plate to hold just over the cake to start decorating the outer rim and side. Then I filled in the sides using wax paper to help push them into the frosting. Before doing any frosting, always remember to line the cake plate with pieces of wax paper that will easily be removed after frosting. This leaves you with a clean plate without gobs of frosting all over!

31 August 2011

Plum overloaded


This morning I sliced and de-seeded about 20 plums. The last of our stash of roughly 20 pounds. That's a lot of plums. They arrived at my door by way of my friend Christiane. She was gifted 30 pounds of fruit and a ton of generosity.

The sliced Italian Plums, also called prune plums, were headed for the dehydrator. As Seth put on his bike helmet and gloves, getting ready to head out for work, he said, "It's like you're a squirrel getting ready for winter."

Exactly. That's what preserving food is about. Delicious berries? Not around come December. But sweet jams take their place. And there's the pickling and the flavored vinegars and the sauces and chutneys. So much goodness, it's going to be hard for winter to dampen my craving for summer foods.

So, those plums? Well, after I, too, gave away a generous amount to neighbors, I got to making a Chinese Plum Sauce. It was so delicious and simple. I canned mine, but this recipe would be just fine eating fresh. Get to it now, while the plums are ripe and ready. It's from Sherri Brooks Vinton's book "Put 'em Up!" This book offers some great ideas for preserving, and I love how it's organized by fruit or veggie. It goes well beyond jams and ice box pickles.


We slathered grilled chicken in this sauce and ate it atop brown rice and grilled summer squash. Nothing to complain about there, but the options are endless. It would be a delicious dipping sauce for just about any roasted veggie, spring rolls, chicken, pork, noodles and even sandwiches. And if my picky eater liked it, I'm going to call it kid friendly for the masses.

Chinese Plum Sauce
from "Put 'em Up!" by Sherri Brooks Vinton

2 pounds of plums, pitted and chopped
1/2 cup cider vinegar
1/2 cup brown sugar, lightly packed
1/4 cup soy sauce
3 tablespoons freshly grated ginger

2 garlic cloves
1 star anise

Combine the plums, vinegar, brown sugar, soy sauce, ginger, garlic and star anise in a large nonreactive pot, and bring to a boil. Reduce the heat and simmer until thickened, 20 to 25 minutes. Fish out the star anise and discard. Puree the sauce with a stick blender. Refrigerate: Ladle into bowls or jars. Cool, cover and refrigerate for up to 3 weeks. OR Can: Use the boiling-water method. Ladle into clean, hot 4-ounce or half-pint canning jars, leaving 1/4 inch of headspace. Release trapped air. Wipe the rims clean; center lids on the jars and screw on jar bands. Process for 10 minutes. Turn off heat, remove canner lid, and let jars rest in the water for 5 minutes. Remove jars and set aside for 24 hours. Check seals, then store in a cool, dark place for up to 1 year.

Notes: I chopped the plums by lightly pulsing the food processor. Then, I dumped almost all of them out and added the lightly chopped ginger and garlic. Then, I pulsed more to chop those more finely. I used anise seeds and made a sachet from cheesecloth for them and fished that out after cooking.

24 August 2011

Giving in and getting lunch

We are waging a battle of control around my house. It's me versus a nearly 3-year-old. And some days, he is on top of his game. But who gets the upper hand is a constant struggle because the decision-making just doesn't stop when you're a toddler.

Can you throw your rock collection down from the top of the stairs? Of course not. Is it OK to jump on the couch? Depends on Mom's mood. Is picking your little brother up in a headlock OK? Not a chance. Can you pee on my leg? Um, no. Will Mom feed a baby doll breakfast, too? You bet.

See what I mean about the battle? This is his response when I say, "Look at the camera."

That last one is so tough for me to say no to even though it means another three minutes before I get to sit down and eat my own breakfast. I'm always the last at the table anyways, so what's it going to hurt to pull out another plate, cup, spoon, bowl and do NOT forget the napkin?

When I was Jasper's age, I had an imaginary friend named Lucy. And she truly looked like Lucy, the Peanuts character. Yep, she was a cartoon, which is perfectly acceptable given her imaginary state. I know, it's not that unusual for kids to have a vivid imagination, but to what extent the parents play along is the bigger question. My parents went all the way, or out of their way may be the better way to say it. They stopped our car in front of the same stranger's house daily and honked the horn. Then, we'd all sit in the car and wait for Lucy to hop in.

I think I turned out all right, my own neurosis aside. And so will my little guy.

Here's a nice nibble for mom that comes from most of the same ingredients you can make a kiddo lunch from.

This pic isn't that great, but you get the idea. The kiddo spilled a full cup of milk while I was taking this.

Mom's Quick Sammie

Sliced bread, preferably a crusty loaf
Grainy mustard
Honey
Apples, thinly sliced
Cheese, try sharp cheddar, Swiss or Gruyere
Salt and pepper

Preheat the oven to broil. Line a baking sheet with foil for easy clean up. Mix roughly equal parts mustard and honey in a small dish and spread onto one side of the bread. Put the bread on the baking sheet. Place the apple slices on the bread next. Top with cheese. Pop under the broiler until the cheese is slightly browned and bubbly. Remove and cool for a couple of minutes. Top with salt and pepper and serve.

18 August 2011

My 3-year-old could do this


If there is no one in your house who would think this looks like a perfect meal, please, go to Fandango, buy tickets to see a documentary and hit the wine bar before the show. You are clearly too cool for me or for these cut up hot dogs in corn bread.

I'm a big fan of anything that makes my life easier. I've also become a fan of picture books. My oldest is now able to look at the pictures and tell me the story. We read him "The Poky Little Puppy" for bedtime last night. It's a Golden Book I remember from my own childhood. In my mature age, the story just seems drawn out in a way that can only mean one thing: No one edits those books.

The pictures were good enough cues, though, for Jasper to retell it this morning while I made mini corn dog muffins. Here's to hoping I can tell a story, or a recipe, through (mostly) pictures.

I cut eight hot dogs into six equal pieces each to make 48 mini muffins.

I made my usual cornbread batter. Any recipe would work. Mine typically makes a 9x9 pan of bread, and it was enough batter for four dozen mini muffins. If you need a good recipe, try this one.


Fill greased mini muffin tins about 1/3 full. Place a hot dog slice in the center of each. Bake at the temperature your recipe directs, but the time will be far less. Mine took about five or six minutes to bake.

Let them cool in the muffin tins for a few minutes, then gently remove and place on a wire rack for further cooling, or serve immediately. After cooling, I transferred this rack straight to the freezer. Once frozen, I tossed them all in an airtight bag. Reheated for about 5 minutes in a 350 degree oven.